Dinner On A Dime

>> Thursday, December 20, 2007


So I have not been doing a lot of fancy cooking lately or much cooking at all for that matter. Baking yes, but cooking no. Which means I have not been doing my weekly grocery shopping and planning of dinners like I usually do. So last night I opened the fridge and there was not much in there. I had to get creative, very creative. So here is a dinner that does not take long to prepare and cost very little to make.

Carrot and Potato Pancakes

The carrots add a nice sweetness to the potato pancakes. If I had a zucchini I would have thrown that in too. Its a great way to get veggies into kids.

2 lg. carrots
1 lb. potatoes (whatever kind you have on hand), peeled
1 onion
1/4 cup flour
1 tsp. salt
1/2 tsp. black pepper
2 large eggs, beaten
vegetable oil for frying

Preheat oven to 400 degrees. Shred carrots, potatoes, and onion on large whole of grater or in food processor. Spread vegetables on paper towels and roll up to squeeze out excess moisture. Add vegetables, flour, salt, pepper, and eggs in large bowl and toss.

Heat enough oil just to cover bottom of non stick skillet. Working in batches drop 2 heaping Tablespoons of mixture into hot skillet. Spread out mixture to form small pancakes. Cook until brown, about three minutes per side. Transfer to baking sheet and repeat with remaining batter. About 15 minutes before you are ready to eat finish pancakes off in oven for 10-15 minutes. Serve with apple sauce and sour cream

Quick and Easy Apple Sauce

2 large apples, cored and peeled
1 Tablespoon honey
dash of cinnamon
2 whole cloves
1/4 cup apple juice or water
pinch of salt

Cut apples into chunks. Put remaining ingredients along with the apples into a small sauce pan. Cover. Simmer on low until apples are tender. Mash with a fork and let cool.
Simple and Delicious!

Read more...

You Didn't measure The Peanut Butter???

>> Tuesday, December 18, 2007


So my friend Sopha (hi Soap) called me up and asked me why I thought her peanut butter cookies came out so flat? "Maybe you over mixed them" I said, "I'm not really sure".
She then proceeded to tell me she got her recipe from Martha and that she did not measure the peanut butter because she was in a hurry. Well I think she may have answered her own question. If there is one thing I have learned in baking, its that you have to measure everything. There are no short cuts in baking, after all it is chemistry.
So I told Sopha I would give her my recipe and here it is. But remember Soap, you really do need to measure the peanut butter (along with everything else).
These are crispy on the outside and chewy on the inside, just as a peanut butter cookie should be!

Jumbo Peanut butter Cookies
adapted from Tish Boyle, The Good Cookie

2 1/2 cups flour
2 tsp. baking powder
1/2 tsp. baking soda
1/4 tsp. salt
2 sticks unsalted butter (1 cup), softened
1 cup creamy peanut butter at room temp. ( I use Skippy)
1 cup granulated sugar
1 cup packed brown sugar
2 lg. eggs
1 Tbsp. vanilla
3/4 cup chopped peanuts plus more for sprinkling on tops of cookies.

Whisk together dry ingredients, set aside.

Using electric mixer beat butter and peanut butter until smooth. Gradually beat in both sugars. Beat in eggs, one at a time. beat in vanilla. With mixer on low gradually add dry ingredients. Fold in chopped peanuts. Cover bowl and refrigerate until dough is firm, about 45 minutes.
Preheat oven to 350 degrees. Lightly grease baking sheet or use parchment.
Scoop out dough with 1/4 cup measuring cup. I left the dough rounded to get a good size cookie. Flatten dough with hand a bit. Use a fork dipped in flour to make a criss cross pattern in each cookie. Sprinkle with chopped peanuts. Bake about 20 minutes until golden around edges but still soft in the middle. be careful not to over bake them or they will not be chewy in the middle. let cool on wire racks. Freezes really well. Enjoy!

Read more...

Church Windows and Cookie Dough

>> Tuesday, December 11, 2007


So I have been doing a lot more baking these days than blogging. I get this sort of itch when days have gone by and I have not posted anything new, especially if I have a lot of beautiful baked goods to blog about. There's just not enough hours in the day this time of year for me! So here is my attempt at blogging during this crazy month of holiday preparation.
Cookies, cookies, cookies! My freezer is filled to the rim with cookies! What says Christmas better than cut out cookies? Not much if you ask me. Here is a wonderful simple sugar cookie recipe with a hint of orange and vanilla. The dough rolls out beautiful and the cookies stay true to form after they are baked.
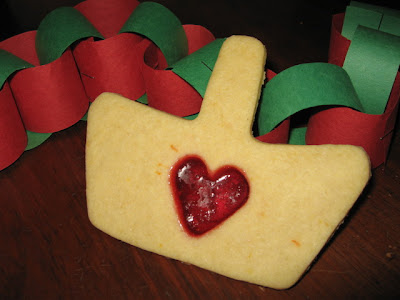
And if you want them to look even more christmasy (is that a word??) you can cut out even smaller shapes and melt some hard candy for a stained glass effect. It reminds me of going to church on Christmas eve, and I don't even go to church on Christmas eve!


Basic Decorative Cookie Dough
adapted from Tish Boyle, The Good Cookie

3 1/4 cups flour
1/4 tsp. salt
1 1/4 cups unsalted butter (2 1/2 sticks)
1 cup granulated sugar
1 large egg
1 large egg yolk
1 Tablespoon vanilla extract
1 Teaspoon finely grated orange zest

Whisk together flour and salt and set aside.

with electric mixer, beat butter and sugar until light and fluffy, about 2 minutes. Add the egg, egg yolk, vanilla, and orange zest and beat until smooth. Add flour a little at a time and mix just until incorporated, be careful not to over mix. wrap dough in plastic wrap and refrigerate until firm, at least 30 minutes.
preheat oven to 350 degrees. Grease two cookie sheets or use parchment paper.
roll dough out to 1/4 inch on lightly floured surface. Cut dough using cookie cutters of your choice. When cookie sheet is full I put it back in the refrigerator to chill for 10 more minutes. This help it retain whatever shape you chose to use.
Bake for 10 to 15 minutes, depending on size of cookie, until pale golden brown. Transfer to cooling rack and cool completely before decorating.
If you want to do the stained glass cookies crush or chop hard candy of your choice (I used Jolly Ranchers cinnamon flavor hard candy). Fill cut outs in with candy before you bake (be careful not to over fill or the candy will go up onto cookie) and bake as directed. Let cool completely on baking sheet so the candy has time to harden up again.

Read more...

I Heart Shortbread

>> Tuesday, December 04, 2007


I looooove shortbread cookies. Maybe its the simplicity of them. Comprised of mostly butter and sugar, whats not to love right? And you can add any kind of flavoring you want to them. Nuts, chocolate, dried fruit, a bit of lemon zest, the possibilities are endless!

Well every year I make these Dried Cranberry Shortbread Cookies , from Ms. Martha, for our Christmas Open House and every year there is not one beautifully wrapped package left. Cut into little hearts, I think they make a delightful gift to give any time of the year.

I usually double the recipe and press it into a 9x13 inch pan. This makes for a slightly thicker cookie than what Martha calls for, which I happen to like. Also if you do it this way add a few minutes to the baking time! You can also just cut these into bars so you have less waste, but I think the hearts are so darn cute! I package them in little clear plastic pillows to sell and they look adorable.


Read more...

Oink!

>> Sunday, December 02, 2007


So I finally started my cookie baking for the Christmas open house. Its going along pretty well. A few glitches here and there but for the most part successful. One issue is, I have one of those side by side refrigerator and freezers, and the freezer does not hold all that much stuff. Needless to say I have had to empty out the freezer of our real food and fill it with Christmas cookies. And yes, it is already almost full and I am only about halfway through with my baking. So that leaves me to hunt down other people's freezers and hope they don't mind storing some of my Christmas goodies.

Note to self: buy a second freezer for next year!

Anyway, a lot of my cookie inspiration this year came from Tish Boyle's book The Good Cookie. This book is filled with lots of wonderful recipes that really work (and let me tell you, that's not always the case). Some recipes I changed a bit, some I didn't change a thing but the end result was always a winner!

A few tips on cookie making:
~Use best ingredients possible (King Arthur Flour)
~Always make sure ingredients are at room temp.
~Let dough chill and rest in fridge for at least an hour.
~If doing cut out cookies chill cookies after you cut them out but before you bake them. This helps them hold their shape better.
~Let cool completely on wire racks before storing.
~Most cookies freeze beautifully for a couple months.

Chocolate Peppermint Polka Dot Pigs
(and yes they are as cute as they sound!)
Adapted from The Good Cookie by Tish Boyle

1 1/2 cups flour
1/2 cup dutch-processed cocoa powder
1/4 tsp. salt
1 1/2 sticks butter, softened (3/4 cup)
3/4 cup granulated sugar
1 lg. egg
1 tsp. vanilla extract
1/4 tsp. peppermint extract
4 oz. good quality white chocolate
1 tsp. shortening
pink paste food coloring
pig shaped cookie cutter
pastry bag

sift the flour, cocoa and salt into medium size bowl and set aside.
Beat the butter until creamy in bowl of electric mixer. Add sugar and beat until light and fluffy, about 2 minutes. Add egg and mix well. Add vanilla and peppermint extract, scraping sides of bowl as you go. Gradually add flour mixture and mix just until blended. Be careful not to over mix. shape dough into a disc and wrap in plastic wrap for at least 2 hours.
preheat oven to 325 degrees. Line baking sheet with parchment paper.
roll dough out on a lightly floured surface to about 1/4 of an inch. Using pig cookie cutter cut out pigs and arrange on cookie sheets about 1/2 inch apart. Reroll scraps and cut out more. Bake cookies for about 8 to 10 minutes until they no longer look wet but should still be soft. Cool on wire racks.
melt white chocolate and shortening in microwave for about a minute. Add pink food coloring to turn mixture a pale pink. Put in pastry bag fitted with plain tip and pipe varied size circles onto pig. Be sure to make a smaller circle for the eye. Let dry completely before packaging or storing.
Makes about 15 cookies (depending on size of cutter).


Read more...

  © Free Blogger Templates Wild Birds by Ourblogtemplates.com 2008

Back to TOP